Desktop-Based Linux Foundation CKAD Practice Test Software
Wiki Article
2026 Latest PassSureExam CKAD PDF Dumps and CKAD Exam Engine Free Share: https://drive.google.com/open?id=15TVsBDlPPzFJmXZAoozL1nvILD4v8jcJ
The CKAD exam questions are designed and verified by experienced and qualified CKAD exam trainers. So you rest assured that with Linux Foundation Certified Kubernetes Application Developer Exam (CKAD) exam dumps you can streamline your CKAD Exam Preparation process and get confidence to pass Linux Foundation Certified Kubernetes Application Developer Exam (CKAD) exam in first attempt.
There are various individuals who have never shown up for the Linux Foundation Certified Kubernetes Application Developer Exam certification test as of now. They know close to nothing about the Linux Foundation Certified Kubernetes Application Developer Exam exam model and how to attempt the requests. Linux Foundation CKAD Dumps give an unequivocal thought of the last preliminary of the year model and how a promising rookie ought to attempt the solicitation paper to score well.
CKAD Online Version, CKAD Test Dumps Demo
There is an old saying goes, the customer is king, so we follow this principle with dedication to achieve high customer satisfaction on our CKAD exam questions. First of all, you are able to make full use of our CKAD learning dumps through three different versions: PDF, PC and APP online version. For each version, there is no limit and access permission if you want to download our CKADstudy materials, and it really saves a lot of time for it is fast and convenient.
Linux Foundation CKAD certification exam is recognized globally as a standard of excellence in Kubernetes application development. Linux Foundation Certified Kubernetes Application Developer Exam certification demonstrates that a developer has the knowledge and skills to design, deploy, and manage Kubernetes-based applications. CKAD certification is highly valued by employers who are looking for developers with the skills to work with Kubernetes and to build and deploy cloud-native applications.
CNCF Certified Kubernetes Application Developer Exam (v1.0)
If you are developing distributed applications running on Kubernetes, you need to know how to build, deploy, and maintain the applications in production environments. Ease of use and management, as well as rapid innovation, are the hallmarks of this fast-growing technology. Professions change fast, but the experience remains valuable. Leader in cloud computing, Google is used to shifting deadlines and demands, and can't quite move at the same pace as others in the market. Provider Google also stands at the center of the digital universe, making them indispensable in open source communities. Quickly enter the Kubernetes ecosystem, and learn how to set up and deploy Kubernetes clusters.
Professional certification on Google's software is hard to find. CNCF Certified Kubernetes Application Developer, on the other hand, can be obtained on the first try. CNCF CKAD Dumps is a multi-node cluster certification, which means that you need about 16 vCPU and at least 30 GB of RAM to complete the exam. A single-node cluster can be created using a laptop. Tough to pass? Even if you do fail the first time, for a limited time, you will receive a free retake. Retakes are given after a waiting period of 30 days. Terms are non-negotiable, and it will take effect after the exam. The exam is not only available in English but also in Chinese, Spanish, French, Italian, Norwegian, Portuguese (Brazil), Dutch, Swedish, Finnish, and Danish. Content may vary by language. Drive your career forward with your new qualification.
Linux Foundation Certified Kubernetes Application Developer Exam Sample Questions (Q220-Q225):
NEW QUESTION # 220
You are running a Kubernetes cluster that manages a critical web application. Your application uses a custom resource called 'Database' to represent database instances. You want to ensure that only authorized users within your organization can create and manage these database instances. How would you implement this using ServiceAccounts and Role-Based Access Control (RBAC)?
Answer:
Explanation:
See the solution below with Step by Step Explanation.
Explanation:
Solution (Step by Step) :
1. Create a ServiceAccount:
- Create a ServiceAccount specifically for managing database instances. This ServiceAccount will be assigned to the users authorized to work with databases.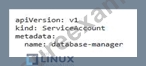
- Apply the ServiceAccount to your cluster using 'kubectl apply -f serviceAccount.yamI' 2. Create a Role: - Define a Role to specify the permissions that the 'database-manager' ServiceAccount should have. This Role will allow the ServiceAccount to create, update, delete, and list 'Database custom resources.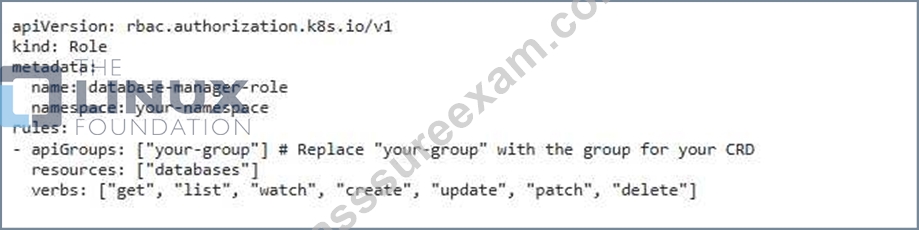
- Apply the Role using 'kubectl apply -f role.yamr 3. Bind the Role to the ServiceAccount - Use a RoleBinding to link the 'database-managers ServiceAccount to the 'database-manager-roles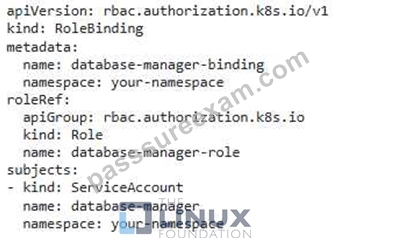
- Apply the RoleBinding using 'kubectl apply -f roleBinding.yaml' 4. Use the ServiceAccount: - When users need to manage database instances, they should authenticate to the Kubernetes cluster using credentials associated with the 'database-manager ServiceAccount This will grant them the permissions defined in the Role. - Example: - 'kubectl create database my-database Important Notes: - Replace "'your-group"' and '"your-namespace"' with the actual values for your custom resource and namespace, respectively. - You might need to create a ClusterRole instead of a Role if you want the permissions to apply across all namespaces in your cluster. - This example assumes you've already defined the CustomResourceDefinition (CRD) for the 'Database' resource.]
NEW QUESTION # 221
You are tasked Witn designing a multi-container Pod tnat nosts botn a web server and a database. The web server should be able to connect to the database within the pod- How would you implement this design, including networking considerations?
Answer:
Explanation:
See the solution below with Step by Step Explanation.
Explanation:
Solution (Step by Step) :
1. Define the Pod YAMI-: Create a Pod definition that includes two containers: one tor the web server and one for the database.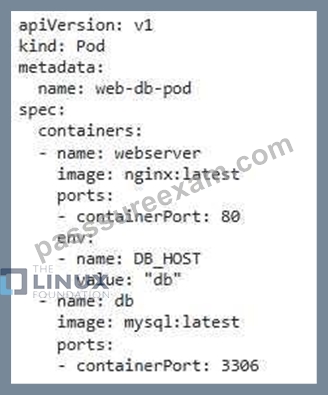
2. Configure Networking: The key to allowing the web server to connect to the database is to use the pod's internal network. Since containers Within a pod share the same network namespace, you can configure the webserver to connect to the database using the name "db". 3. Environment Variables: Set an environment variable CDB HOST') within the webserver container to point to the database container by its name. This ensures the web server can correctly connect to the database within the pod. 4. Pod Deployment: Apply the YAML to create the pod using 'kubectl apply -f web-db-pod.yamr. 5. Verification: To check the pod's status: - Run 'kubectl get pods' - Check the logs of the web server container to confirm it can connect to the database. 6. Important Note: In this example, we're using the default pod networking within Kubernetes. For more complex applications, consider using a service to expose the database container This will allow access to the database from outside the pod.,
NEW QUESTION # 222
You have a Kubernetes cluster with a Deployment named 'my-app' running a simple web application. The 'my-app' Deployment is configured to use a ServiceAccount named 'my-app-sa' _ You want to ensure that only authorized users with specific permissions can access the 'my-app' pod's logs. How would you implement this using Role-Based Access Control (RBAC)?
Answer:
Explanation:
See the solution below with Step by Step Explanation.
Explanation:
Solution (Step by Step) :
I). Create a Role:
- Define a new Role named 'my-app-log-reader' that grants access to read logs of the 'my-app' pod.
- This role will be bound to the ServiceAccount used by the 'my-app' Deployment.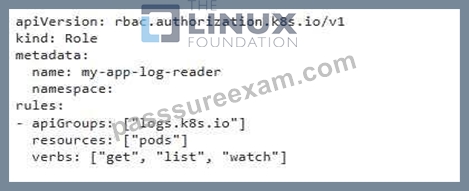
2. Create a RoleBinding: - Create a RoleBinding named 'my-app-log-reader-binding' to link the 'my-app-log-reader' Role to the 'my-app-sa' ServiceAccount. - This binding allows the 'my-app-sa' to use the permissions defined in the 'my-app-log-reader' role.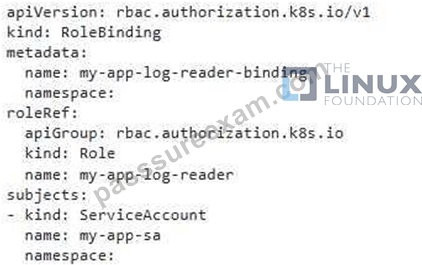
3. Apply the Configurations: - Apply the Role and RoleBinding YAML files to your Kubernetes cluster using 'kubectl apply -f role.yamr and 'kubectl apply -f rolebinding_yamr 4. verify the RBAC: - Once applied, you can verify the RBAC configuration by using 'kubectl auth can-i get pods --as=my-app-sa --namespace=' - This command should show 'yes' indicating that the ServiceAccount can access pods. - You can also check for access to logs with a similar command: 'kubectl auth can-i get pods/my-app-pod-name --namespace=' - Replace "my-app-pod-name' with the actual pod name of the application. 5. Test Access: - Try accessing the logs using "kubectl logs my-app-pod-name -n ' while impersonating the ServiceAccount 'my-app-sa' - You should be able to view the logs successfully. If any user tries to access the logs without the necessary permissions, they will be denied. Important Note: This is a basic example and can be further Kustomize d depending on your specific security needs. You can adjust the 'rules' in the Role definition to control specific permissions for users or ServiceAccounts. For example, you might restrict access to certain namespaces or resources. ]
NEW QUESTION # 223
You are designing a microservice architecture where a frontend application needs to communicate with multiple backend services. The services are deployed as Pods in a Kubernetes cluster- To streamline communication and security, you decide to implement a sidecar proxy pattern Explain the benefits of using a sidecar proxy in this scenario and illustrate how you would implement it using a container image like Envoy Proxy.
Answer:
Explanation:
See the solution below with Step by Step Explanation.
Explanation:
Solution (Step by Step) :
1. Understand Sidecar Proxy Pattern:
- In the sidecar proxy pattern, a proxy container runs alongside your main application container within the same Pod.
- The proxy acts as an intermediary, handling network tratfic between your application and other services.
2. Benefits of Using a Sidecar Proxy:
- Traffic Management:
- Routing requests to different backend services.
- Load balancing across multiple instances ot a service.
- Security:
- Enforcing access control and authentication.
- Handling SSL termination.
- Observability:
- Monitoring and logging network traffic.
- Simplified Development:
- Separating networking concerns from application logic.
3. Implementing with Envoy Proxy:
- Choose Envoy Proxy:
- Envoy is a popular open-source proxy designed for high-performance network communication.
- Create a Deployment YAML:
- Define a Deployment for your application, including a main container for your application code and a sidecar container for Envoy Proxy.
4. Configure Envoy: - Create a ConfigMap: - Create a ConfigMap to hold the Envoy configuration (envoy-yaml). - Define the routes, listeners, and clusters for your services.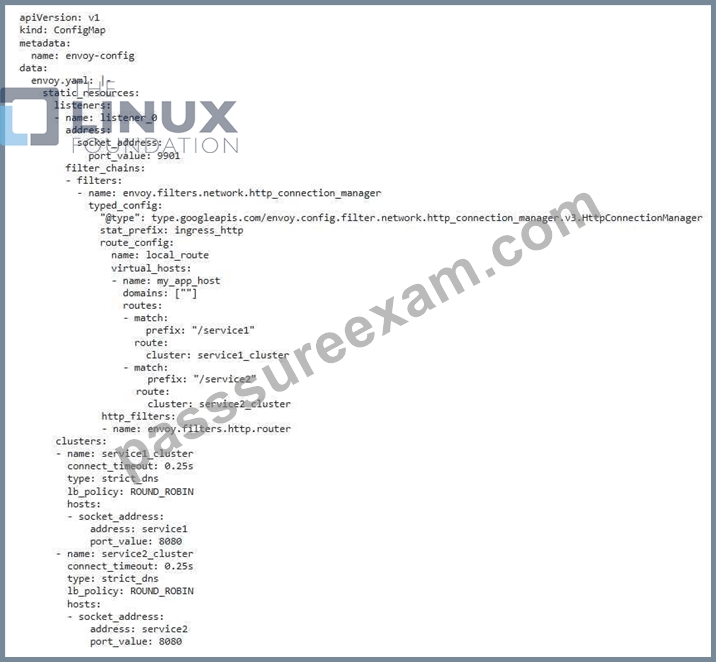
5. Deploy the Configuration: - Apply the Deployment and ConfigMap using 'kubectl apply -f deployment.yaml' and 'kubectl apply -f configmap.yaml' 6. Test tne Setup: - Access your trontend application from outside the cluster. - Verity that traffic is routed correctly to the backend services through the Envoy proxy. 7. Optional: Service Discovery: - For more dynamic environments, you can integrate Envoy with service discovery mechanisms like Kubernetes Service or Consul to automatically update its configuration based on service changes. This configuration assumes that your backend services are named "servicel " and "service2" with ports 8080. Adjust the configuration based on your specific services and their port numbers.,
NEW QUESTION # 224
You are building a web application that requires environment-specific configurations, such as database connection details and API keys. You want to use ConfigMaps to manage these configurations in a secure and efficient way You have the following environment variables defined in your deployment YAML: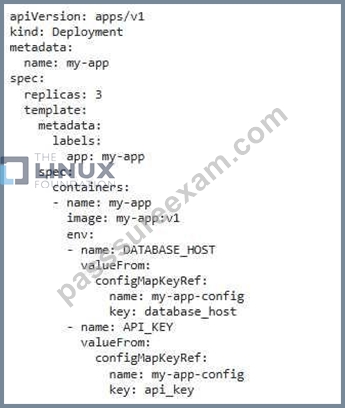
Create a ConfigMap named 'my-app-config' containing the following data: - 'database host: 'db.example.com' - 'api_key':
Answer:
Explanation:
See the solution below with Step by Step Explanation.
Explanation:
Solution (Step by Step) :
1. Create the ConfigMap: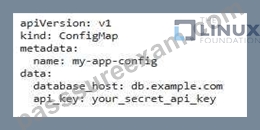
2. Apply the ConfigMap: bash kubectl apply -f my-app-config.yaml 3. Verify the ConfigMap: bash kubectl get configmap my-app-config -o yaml This command will display the created ConfigMap and its contents. 4. Deploy the Deployment: bash kubectl apply -f deploymentyaml The deployment Will now use the values from the ConfigMap to populate the environment variables within the containers. 5. Check the Pods: bash kubectl get pods -l app=my-app -o wide 6. Confirm Environment Variables: bash kubectl exec -it bash -c 'env' Replace with the name of one of the pods. This command will display the environment variables set within the container, including 'DATABASE HOST and 'API KEY'. Note: You should replace with your actual API key in the ConfigMap. This ensures that sensitive information is stored in a separate configuration file and not directly in the deployment YAML file.
NEW QUESTION # 225
......
Facing the incoming CKAD exam, you may feel stained and anxious, suspicious whether you could pass the exam smoothly and successfully. Actually, you must not impoverish your ambition. Our suggestions are never boggle at difficulties. It is your right time to make your mark. Preparation of exam without effective materials is just like a soldier without gun. You will be feeling be counteracted the effect of tension for our CKAD practice dumps can relieve you of the anxious feelings.
CKAD Online Version: https://www.passsureexam.com/CKAD-pass4sure-exam-dumps.html
- Complete CKAD Exam Dumps ☝ CKAD Verified Answers ???? CKAD Latest Dumps Free ???? Search for ➠ CKAD ???? and download it for free immediately on 《 www.vce4dumps.com 》 ????CKAD Exam Dump
- CKAD Training Solutions ???? CKAD Exam Dump ???? CKAD Training Solutions ???? Enter ➥ www.pdfvce.com ???? and search for ⮆ CKAD ⮄ to download for free ????CKAD Verified Answers
- Exam CKAD Outline ???? CKAD Reliable Exam Review ???? CKAD Trustworthy Source ???? Open website ⮆ www.dumpsmaterials.com ⮄ and search for ⮆ CKAD ⮄ for free download ????CKAD Training Solutions
- CKAD Verified Answers ???? CKAD Exam Certification Cost ???? Reliable CKAD Test Sample ???? Search for ( CKAD ) on ➥ www.pdfvce.com ???? immediately to obtain a free download ????CKAD Valid Learning Materials
- CKAD Latest Test Fee|100% Pass|Real Questions ✊ ⮆ www.prep4away.com ⮄ is best website to obtain 《 CKAD 》 for free download ????New CKAD Dumps Files
- New CKAD Dumps Files ???? Latest CKAD Test Cram ???? CKAD Training Solutions ???? Search for ▷ CKAD ◁ and download it for free immediately on 「 www.pdfvce.com 」 ????New CKAD Test Discount
- Reliable CKAD Test Sample ✌ CKAD Reliable Exam Pattern ???? CKAD Trustworthy Source ???? Open [ www.vce4dumps.com ] and search for ⮆ CKAD ⮄ to download exam materials for free ????Latest CKAD Test Cram
- CKAD Training Solutions ???? CKAD Exam Certification Cost ???? CKAD Trustworthy Source ???? Easily obtain ⮆ CKAD ⮄ for free download through ➠ www.pdfvce.com ???? ????Latest CKAD Test Cram
- 100% Pass-Rate CKAD Latest Test Fee bring you Fast-download CKAD Online Version for Linux Foundation Linux Foundation Certified Kubernetes Application Developer Exam ???? Open 《 www.testkingpass.com 》 enter ⏩ CKAD ⏪ and obtain a free download ????CKAD Reliable Exam Review
- Get 100% Pass Rate CKAD Latest Test Fee and Pass Exam in First Attempt ☢ Search for [ CKAD ] on 《 www.pdfvce.com 》 immediately to obtain a free download ????CKAD New Study Guide
- New CKAD Dumps Files ???? Latest CKAD Test Cram ???? CKAD Trustworthy Source ???? Go to website ➡ www.practicevce.com ️⬅️ open and search for “ CKAD ” to download for free ????CKAD Exam Certification Cost
- www.stes.tyc.edu.tw, shaunaccio301477.blogozz.com, triplexdirectory.com, donnaqioh006933.luwebs.com, poppiedrth071613.kylieblog.com, bookmarkfavors.com, lawsongnua838946.blogvivi.com, fortunetelleroracle.com, phoenixfeui251632.blogdosaga.com, friendlybookmark.com, Disposable vapes
BONUS!!! Download part of PassSureExam CKAD dumps for free: https://drive.google.com/open?id=15TVsBDlPPzFJmXZAoozL1nvILD4v8jcJ
Report this wiki page